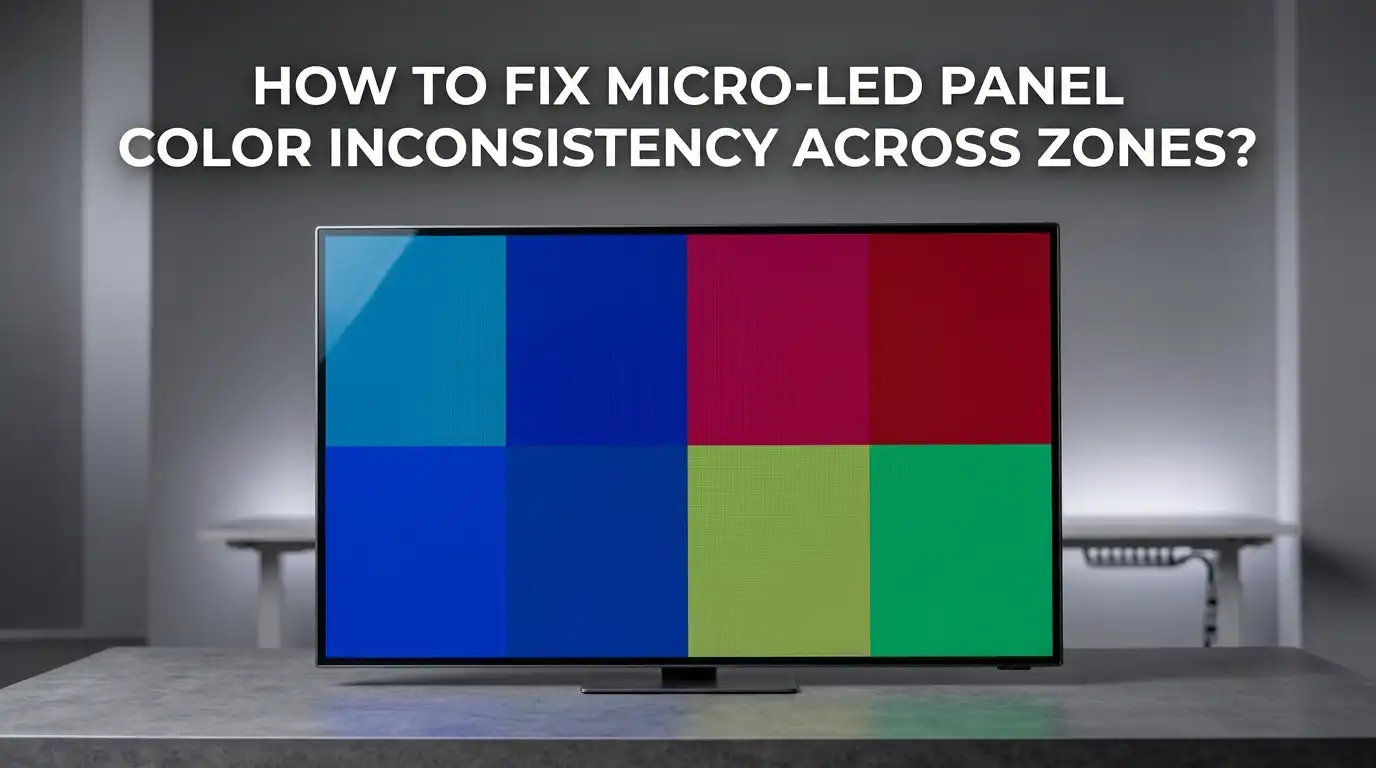
How to Fix Micro-LED Panel Color Inconsistency Across Zones?
You sit down to watch your favorite movie. The opening scene is a bright sunrise. But instead of a smooth golden glow, your screen shows visible patches. One zone looks warm yellow. The zone right next to it looks cool blue.
You notice banding, color shifts, and uneven brightness. This is Micro-LED panel color inconsistency across zones. It can ruin any viewing experience. The good news is that you can fix this problem.
This guide will walk you through every practical fix. You will learn why these color differences happen. You will discover simple picture settings you can change right now.
In a Nutshell:
- Micro-LED color inconsistency appears as visible patches or bands where different screen zones show different color temperatures or brightness levels. This happens because each tiny LED is its own light source. Manufacturing differences, aging, and signal errors all contribute to zonal color mismatch.
- You should always start with a full system restart. Power off the display panels and sending card. Wait 30 seconds. Turn on the sending card first, then the panels. Many intermittent color issues clear up after a clean reboot. This simple step saves you hours of troubleshooting.
- White balance and picture settings are your most powerful home tools. Adjusting the 2-point and 10-point white balance settings can neutralize color casts across zones. Lowering local dimming from “High” to “Medium” often reduces visible banding between zones. These changes are free and take only minutes.
- Environmental factors can trick your eyes. Room lighting with a strong color temperature can make a uniform panel look uneven. Always test your display in a completely dark room before you decide the panel has a hardware problem.
- Professional point-by-point calibration is the ultimate fix for aging panels. When software adjustments cannot fix the problem, a calibration technician uses a spectrometer and imaging colorimeter. They measure every pixel and generate a correction map. This restores factory-level uniformity across all zones.
- If the panel is new and shows severe zonal color mismatch, this is a warranty issue. Contact your manufacturer or retailer immediately. Take clear photos of the problem using test patterns. Do not try advanced hardware fixes on a panel that should be replaced under warranty.
Understand Why Zonal Color Inconsistency Happens
Micro-LED panels differ from traditional LCD screens. Each microscopic LED acts as its own independent light emitter. A 4K Micro-LED panel contains over 24 million individual LEDs. Even tiny production differences between these LEDs create visible problems.
Some LEDs emit slightly warmer light. Others lean cooler. When these LEDs are grouped into zones, you see patches of different color temperatures across the screen. This is a physical property of the manufacturing process.
No factory can produce millions of perfectly identical LEDs. The panel uses correction data called demura to balance these differences. Over time, red, green, and blue LEDs also age at different rates. Green LEDs typically hold their brightness longer than red or blue LEDs.
This differential aging causes the white balance to drift. Zones that age faster will start to look different from slower-aging zones. Loose data cables, oxidized connectors, and failing driver ICs can also corrupt the color signal to specific zones.
Perform a Full System Restart First
Before you dive into any complex fix, give your system a clean reboot. A surprising number of color inconsistency problems come from temporary signal errors. The sending card and receiving cards can develop buffer errors over time.
These errors corrupt the color data for specific zones. Turn off the display completely. Unplug the power cable from the wall outlet. Wait a full 60 seconds. While you wait, check that all HDMI and data cables are firmly seated.
Power the sending card back on first. Then power on the panels. Play a solid white test image on the full screen. Observe if the color patches have disappeared or changed position. If the problem disappeared after the restart, you had a temporary signal error.
Monitor the panel for a few days. If the problem keeps coming back, you likely have a hardware issue that needs deeper attention. A restart costs you nothing and takes only two minutes. Always make this your first step.
Check and Adjust Your Picture Settings
Your panel’s picture settings have a huge impact on zonal color consistency. Start by switching to the “Movie” or “Filmmaker” picture mode. These modes usually have the most accurate out-of-the-box color settings.
Avoid “Vivid” or “Dynamic” modes because they over-process the image and exaggerate color differences between zones. Next, find the local dimming setting in your picture menu. Set it from “High” to “Medium” or “Low.”
High local dimming aggressively drives zones to extreme brightness. This makes the color temperature difference between adjacent zones much more visible. A medium setting softens these zone transitions. Also turn off any “Dynamic Contrast” or “Contrast Enhancer” features.
These settings constantly adjust the backlight and color in real time. They often create visible pumping and shifting between zones.
Fine-Tune the White Balance Settings
White balance is the single most powerful consumer-level tool for fixing zonal color mismatch. A correct white balance neutralizes color casts that make zones look different from each other. Most Micro-LED displays offer a 2-point white balance control.
This adjusts the red, green, and blue levels for the bright and dark ends of the grayscale. Start here. Reduce any channel that appears dominant. If the screen looks too warm and yellowish, bring down the red gain slightly. If it looks too cool and bluish, reduce the blue gain.
Higher-end panels also have a 10-point or 20-point white balance system. This lets you adjust white balance at multiple brightness intervals. For example, you can reduce a green push that only appears at 50 percent brightness.
Make small changes. Adjust one point at a time. Use a grayscale test pattern from YouTube to check your results. The goal is to make a neutral white that looks the same across every zone on the screen.
Use Gamma and Color Space Settings Correctly
Gamma controls how brightness levels map from the source signal to your panel. An incorrect gamma setting makes zonal color differences more obvious. Set your gamma to 2.2 for most living room environments.
Gamma 2.4 works better in completely dark home theater rooms. If your gamma is set too low, like 1.8 or 1.9, shadow areas become washed out. This reveals color differences in dark zones that would normally be invisible.
Next, set your color space to “Auto” or “Native” depending on your content. Using the wrong color space forces the panel to remap all colors. This remapping process can create color banding between zones.
For standard content, sRGB or BT.709 is the correct choice. For HDR content, use DCI-P3 or BT.2020. Most modern panels auto-detect the correct color space. But double-check this setting if you see strange color shifts across zones.
Test for Environmental and Ambient Light Interference
Your room lighting can trick you into thinking your panel has a color problem. The human eye constantly adjusts its white point based on ambient light. If your room has warm 3000K light bulbs, your eyes will perceive the screen as cooler than it really is.
Different light sources hitting different parts of the screen make the problem even worse. Try this test. Turn off every light in the room. Close the curtains or blinds. Wait two minutes for your eyes to adjust to the dark. Now look at a full white screen on your panel.
Did the color patches become less noticeable or disappear completely? If yes, your room lighting is the real culprit. Fix the room lighting before you try to fix the panel. Swap warm bulbs with 6500K daylight-balanced LED bulbs.
Add bias lighting behind the screen. Bias lighting is a neutral white light strip that creates a consistent reference for your eyes. This simple change often eliminates the perception of zonal color differences.
Inspect Physical Connections and Cables
Loose or damaged cables send corrupted data to specific zones. This creates color errors that look like a panel uniformity problem. Start by disconnecting and re-seating every HDMI cable. Check the connectors for bent pins or dust.
Then move to the data ribbon cables between the panel modules. These thin flat cables can work loose over time, especially in warm environments where thermal expansion occurs. Unplug each ribbon cable. Inspect the gold contacts for oxidation.
Clean oxidized contacts gently with a pencil eraser. Re-seat each cable firmly until you hear or feel a click. If you have spare cables, swap them one at a time and check if the color error moves or disappears. A single bad cable can corrupt color data for an entire zone.
This is especially common after moving or re-installing a large display wall. The time you spend checking cables often saves you from more expensive fixes later.
Run a Panel Refresh or Pixel Conditioning Cycle
Many Micro-LED panels have a built-in panel refresh or conditioning cycle. This process recalibrates the internal compensation data for each zone. The panel measures the current output of aging LEDs and adjusts the driving current to re-balance zones.
Find this feature in your panel’s service menu or settings menu. It is often labeled “Pixel Refresh,” “Panel Care,” or “Uniformity Compensation.” Run this cycle completely without interruption. It can take anywhere from 10 minutes to over an hour.
Do not turn off the panel during the process. After the cycle finishes, power the panel off for at least 30 minutes. When you turn it back on, check the zonal color consistency again.
This refresh cycle is particularly effective for panels that have been in heavy use for two or more years. Run this cycle every six to twelve months as preventive maintenance.
Know When to Seek Professional Calibration
Sometimes your own efforts hit a wall. The color inconsistency remains visible and distracting. This is when you need a professional calibrator. A trained technician brings specialized tools. They use a spectrometer to measure the actual spectral output of your panel.
They use an imaging colorimeter to capture color data from every single pixel. The technician runs point-by-point calibration software that generates a unique correction map for your panel.
This correction map adjusts the signal to each individual zone. It compensates for all the aging differences and manufacturing variations that cause your specific zonal mismatch. The process usually takes two to three hours.
The result is a screen where every zone matches every other zone in both color and brightness. Professional calibration typically costs between two hundred and five hundred dollars.
This is far cheaper than replacing a large Micro-LED panel. The calibration data is stored on the panel’s receiving cards and stays active even after firmware updates.
Understand When It Is a Hardware Defect
Some zonal color problems go beyond what calibration can fix. A failed driver IC on one zone creates a strong and consistent color cast that affects a specific rectangular area. A damaged receiving card can corrupt color for an entire group of zones.
If you see a sharp, straight-edged color difference that does not move or change with content, you likely have a hardware failure. Swap the receiving card with a spare if you have one.
If the color error moves with the card, you have identified the failed component. If the problem stays with the same panel section, the fault is in the LED module itself. Individual LED failure in one color channel will make that zone look permanently tinted.
For example, a zone with dead red LEDs will look cyan or greenish. This is not fixable with calibration. The module needs factory repair or replacement.
Use Test Patterns to Accurately Diagnose Zone Issues
Stop guessing what your eyes are seeing. Use proper test patterns to measure the problem objectively. Search YouTube for “grayscale uniformity test,” “white screen test,” and “color gradient test.”
A full white screen reveals zones that are warmer or cooler than the surrounding area. A 5 percent gray screen reveals dark patches and banding that you miss on bright content. A color gradient test shows you exactly where the color transitions become uneven or show banding.
Take photos of each test pattern on your panel. These photos become valuable evidence if you need to file a warranty claim.
They also help a professional calibrator understand your specific problem before they arrive. Test patterns turn a subjective “something looks off” into an objective diagnosis. This saves time and ensures you apply the right fix.
Set Up Bias Lighting for Consistent Perception
Bias lighting is one of the most underrated tools for solving perceived zonal color issues. You place a neutral 6500K LED light strip behind your panel. The light washes the wall behind the screen with a consistent white glow.
This creates a constant reference point for your eyes. Your pupils do not constantly dilate and contract as the screen brightness changes. The result is that minor zonal color differences fade into perceptual invisibility. Your eyes simply stop noticing them.
A good bias light costs twenty to forty dollars and sticks directly to the back of your panel. Make sure the color temperature is exactly 6500K for accurate perception.
Avoid RGB color-changing strips because they add color casts to your wall that defeat the purpose. This simple hardware addition often fixes more problems than any software setting ever could.
Keep Firmware Updated for Color Processing Fixes
Manufacturers constantly improve their color processing algorithms. A firmware update can dramatically change how your panel handles zonal color uniformity. Check your panel’s settings menu for a System Update or Software Update option.
Connect your panel to the internet and let it search for updates automatically. If automatic update does not work, visit the manufacturer’s support website. Search for your exact model number.
Download the latest firmware file to a USB drive. Follow the manual update instructions carefully. Do not turn off the panel during the update process. Many panels released in the last two years have received specific updates to improve demura processing and zonal uniformity.
A panel that looked patchy on the launch firmware may look smooth and consistent after two or three firmware updates. Make firmware checks part of your regular maintenance routine.
Handle Warranty Claims the Right Way
If your panel is less than one year old and shows clear zonal color mismatch, this is a warranty issue. Do not open the panel or attempt any internal repairs. Doing this voids your warranty immediately.
Instead, document the problem carefully. Use the test patterns I described earlier. Take clear photos in a dark room with no reflections. Write down your panel’s model number, serial number, and purchase date. Contact the retailer or manufacturer support team.
Describe the problem using the terms you learned in this guide. Say “visible color temperature difference between zones on a full white field” instead of “the screen looks weird.” Be firm but polite. Most manufacturers have acceptable uniformity thresholds.
If your panel exceeds these thresholds, they will authorize a replacement. A replacement panel will have been calibrated to a higher standard before shipping. Do not accept a visibly defective panel as normal. You paid for a premium display and you deserve premium uniformity.
Frequently Asked Questions
Why does my Micro-LED panel look different colors in different areas?
This happens because each Micro-LED is an independent light source. Tiny manufacturing variations cause some LEDs to emit slightly warmer or cooler light. When grouped into zones, these variations become visible patches. Aging also plays a role. Red, green, and blue subpixels degrade at different rates over thousands of hours of use. Zones with more hours accumulate more differential aging. Signal errors from loose cables or failing receiving cards can also corrupt color data to specific zones.
Can I fix zonal color inconsistency without hiring a professional?
Yes, in many cases you can. Start with a full system restart. Then switch your picture mode to Movie or Filmmaker mode. Lower the local dimming setting from High to Medium. Adjust the 2-point white balance to reduce dominant color casts. Turn off Dynamic Contrast and Contrast Enhancer. Run the built-in panel refresh cycle. Add bias lighting behind the screen. These steps solve mild to moderate zonal color mismatch for most users.
Will professional calibration permanently fix the color zones?
Professional calibration using point-by-point measurement creates a correction map that balances every zone on your panel. The results are excellent and can last one to three years. But the fix is not truly permanent. All LEDs continue to age and drift after calibration. This is why commercial installations schedule recalibration every twelve to eighteen months. For home users, a single professional calibration often provides satisfactory results for several years.
How do I know if my panel has a hardware defect instead of a settings problem?
A hardware defect usually shows a sharp, straight-edged color difference that does not move or change with different content. A failed driver IC creates a distinct rectangular patch with a permanent color cast. Dead subpixels in one color channel make an entire zone look tinted. If you swap the receiving card and the color error moves with the card, that card is the failed component. If you see a soft, gradual color shift that changes with content brightness, you are likely dealing with a calibration or aging issue that settings can improve.
Does room lighting really affect how I see color zones on my screen?
Absolutely. Your eyes constantly adjust their white point based on the ambient light in the room. A warm 3000K lamp makes the screen look cooler and bluer. Sunlight coming through a window at different times of day changes your color perception. Different lights hitting different parts of the screen create the illusion of zonal color differences. Always test your panel in a completely dark room before you conclude the panel has a problem. Adding consistent 6500K bias lighting behind the screen solves most perception-based issues.

Hi, I’m Frankie Shaw, the founder and writer behind Swittchly 👋. I’m a passionate tech enthusiast who loves exploring the latest gadgets, devices, and electronics that hit the market. Through my honest, research-backed Amazon product reviews, I help readers make smarter buying decisions without the hype or confusion.