How To Fix Cotton Candy Machine Extractor Head Jamming?
Does your cotton candy machine stop spinning right after you turn it on? This is a common problem. It usually means your extractor head is jammed.
The extractor head is the heart of your machine. It spins fast and gets very hot. This heat melts sugar into floss.
But that same heat causes a big issue. Melted sugar can cool and stick inside the head. This buildup blocks the spinner from moving freely.
In a Nutshell
- Find the jam source. The extractor head is where melted sugar builds up. This buildup stops the spinning motion.
- Unscrew the center nut first. This gives you access to the extractor head. Take it out gently along with the washers.
- Soak a pumice stone in warm water for five minutes. This softens the stone for cleaning.
- Mix warm water with white vinegar. This solution breaks down hardened sugar residue. Wipe the head with a clean rag.
- Reassemble the washers in the correct order. Wrong placement is a common mistake. This can cause the head to jam again.
- Avoid skipping the disassembly step. Trying to clean without opening the head rarely works. Full cleaning is the only real fix.
Understanding the Extractor Head and Why It Jams
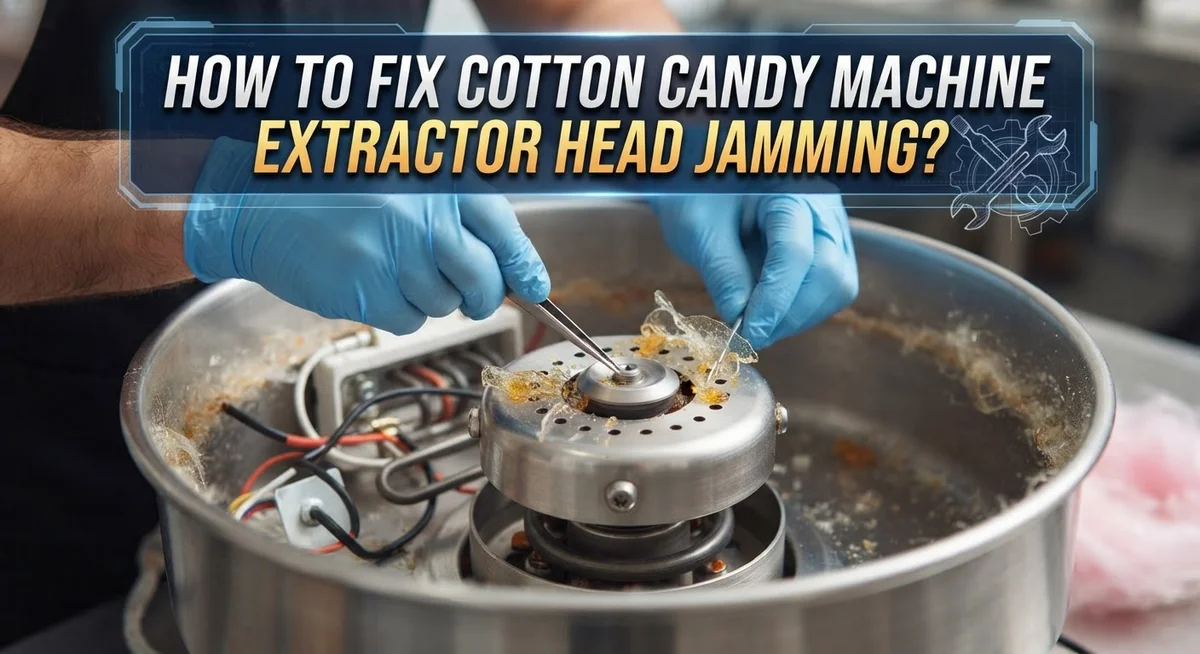
The spinner head sits at the center of your cotton candy machine. This is where the magic happens. Sugar crystals melt into liquid, then spin outward through tiny holes to form those fluffy strands you love.
Here’s the problem: the head gets extremely hot during operation. This heat is necessary for melting sugar, but it creates a sticky situation. As the machine runs, melted sugar doesn’t always flow smoothly through the openings. Some of it cools and hardens right inside the head itself.
Over time, this hardened sugar builds up like a wall. The buildup gets thicker with each use. Eventually, the spinner can’t rotate anymore. Your machine stops spinning within minutes of startup, or sometimes it won’t spin at all.
Why does this happen so fast? The heat keeps some sugar soft and sticky. When the machine stops running, that sticky residue cools down. It hardens into a cement like substance that locks the spinner in place.
Understanding this process helps you prevent future jams. You now know the jam forms from sugar buildup, not from a broken motor or damaged parts. This is actually good news because you can clean it yourself.
The jamming isn’t a sign your machine is broken. It’s a sign your machine needs cleaning. Regular maintenance stops this problem before it starts. Even new machines need this care after several uses.
Once you understand where the jam forms and why, the fix becomes straightforward. You simply need to access that spinner head, remove the buildup, and reassemble it correctly. The next sections walk you through each step of this process.
Signs Your Cotton Candy Machine Is Jamming
Your cotton candy machine shows several warning signs before it completely jams. Recognizing these signals helps you catch problems early.
The most obvious sign is when your machine stops spinning within minutes of startup. You turn it on, hear the motor run, but the head barely rotates. This happens because sugar buildup blocks the spinner from moving freely.
Listen for grinding or squeaking sounds coming from the center of the machine. These noises mean friction is building between the head and the housing. The motor works harder to push through the resistance, and eventually it gives up.
Pay attention to how long your machine runs before jamming. If it used to work for an hour but now stops after ten minutes, buildup is accumulating faster. This timeline tells you the blockage is getting worse.
Check if the machine won’t restart after jamming. You power it off, wait a few minutes, then try again. If the head still won’t spin, hardened sugar is locking everything in place.
Look at the extractor head itself. If you see crusty, brown residue around the center nut, that’s your culprit. The buildup looks like hardened caramel stuck to the metal.
Feel the heat around the spinner area. The head gets extremely hot during operation, which is normal. But if it feels unusually hot to the touch even after cooling, sugar buildup is trapping extra heat inside.
You might also notice the machine making a clicking sound when you try to turn it on. This click means the motor is trying to spin the head, but something solid is blocking its path.
These signs all point to the same problem: sugar accumulation in your extractor head. Catching them early makes cleaning much easier.
Tools and Supplies You’ll Need Before You Start
Before you start fixing your cotton candy machine, gather the right items. You need basic supplies that you probably have at home already.
First, get a wrench or socket set. You’ll use this to unscrew the center nut holding the extractor head in place. Make sure your wrench fits the nut snugly so you don’t strip it.
Next, find a pumice stone. This porous rock removes stuck sugar buildup without scratching the metal head. A regular pumice stone works perfectly for this job.
You’ll need white vinegar and warm water. Mix these together to create a cleaning solution that breaks down hardened sugar residue. The vinegar cuts through sticky buildup that water alone cannot remove.
Grab a cleaning rag or soft cloth. Use this to wipe away debris after soaking and scrubbing. Avoid rough materials that might damage the head’s surface.
Get a small container or bowl for soaking. Fill it with warm water and your pumice stone. You need enough space to work comfortably with the stone.
Have a dry towel nearby. You’ll use this to dry all components before reassembly. Moisture left on parts can cause problems when the machine heats up.
Consider having a flashlight handy too. The center of your machine gets dark, and you need to see the washers and nut clearly.
Finally, keep a notepad or your phone camera ready. Take photos as you disassemble the head. This helps you remember the correct order when putting washers back together.
These supplies are simple and affordable. Most people already own everything on this list.
Step-by-Step Guide to Disassembling the Extractor Head
Start by unplugging your cotton candy machine from the electrical outlet. This step keeps you safe from electrical shock and moving parts. Wait at least 10 minutes for the machine to cool down completely before touching any components.
Locate the center nut at the top of the extractor head. This nut holds the entire spinning assembly together. Use your wrench or socket set to turn it counterclockwise slowly and carefully.
Once the nut loosens, remove it by hand and set it aside in a safe spot. You’ll need this nut again during reassembly, so don’t lose it.
Gently lift the extractor head straight up and away from the machine base. The head may feel sticky or have hardened sugar stuck to it. This is completely normal and expected.
Below the head, you’ll see metal washers stacked on top of each other. These washers are crucial for proper reassembly. Take a photo or make a note of their exact order and position before removing them.
Carefully remove each washer one at a time. Place them in order on your notepad or towel so you remember their sequence.
Set all removed parts on a clean surface away from the machine. Keep everything organized and grouped together.
Examine the spinner head closely under good lighting. You’ll see thick, hardened sugar coating the inside surfaces. This buildup is what causes jamming during operation.
Now your extractor head is fully disassembled and ready for cleaning. The next phase involves soaking and scrubbing away all that accumulated sugar. Proper disassembly makes the cleaning process much more effective and thorough.
Cleaning the Extractor Head Thoroughly
Your extractor head needs careful cleaning to remove hardened sugar buildup. Start by filling a small container with warm water and add white vinegar. The vinegar breaks down sugar residue that water alone cannot remove.
Soak your pumice stone in this warm vinegar solution for at least 5 minutes. The stone becomes softer and more effective after soaking. This step is important for debris removal.
Take your extractor head and place it in the warm vinegar solution as well. Let it soak for several minutes to loosen the melted sugar stuck inside. You can gently rotate the head to help the solution reach all areas.
Use your cleaning rag to wipe away loose sugar from the head’s surfaces. Work slowly and carefully since the head has small crevices where sugar hides. Pay special attention to the center spinning area where most buildup occurs.
Now use your soaked pumice stone to scrub the interior of the head. Apply gentle pressure and use circular motions. The pumice removes stubborn sugar that won’t dissolve. Rinse the head thoroughly with clean warm water.
Inspect your head under good lighting to confirm all residue is gone. Look for any white or brown sugar deposits remaining inside. If you spot more buildup, repeat the soaking and scrubbing process.
Dry your extractor head completely with a clean towel. Any moisture left behind can cause problems during reassembly. Your head is now clean and ready for the next steps.
Proper cleaning prevents future jamming issues and keeps your machine running smoothly for longer periods.
Reassembling the Extractor Head Correctly
Putting your extractor head back together correctly is critical for proper operation. Washer placement matters more than most people realize because incorrect ordering causes misalignment and jamming.
Start by laying out all your washers in the exact order you removed them. Take a photo or write down their sequence before cleaning. This reference prevents confusion during reassembly.
Position the bottom washer first on the center rod. This washer sits directly on the machine base and provides the foundation for everything above it. Make sure it sits flat and level.
Add the remaining washers one at a time in their original order. Each washer should rest flat against the one below it. Press down gently to ensure proper seating.
Lower your cleaned extractor head carefully onto the washer stack. The head should sit straight and centered on the rod. Misalignment here causes spinning problems later.
Thread the center nut back onto the rod by hand first. This prevents cross threading and damage to the threads. Once hand tight, use your wrench to secure it firmly.
Tighten the nut until it’s snug but not over tightened. Over tightening damages threads and makes future disassembly difficult. You want resistance but not extreme force.
Spin the head by hand to verify smooth rotation. It should turn freely without grinding or resistance. Any grinding means something is misaligned.
Double check that all washers remain seated properly. Vibration during operation can shift washers if they’re not positioned correctly. Proper assembly prevents this issue entirely.
Your reassembled head is now ready for testing. Plug in your machine and run it briefly to confirm smooth operation. Listen for any unusual sounds that indicate problems.
Common Mistakes to Avoid During the Fix
When fixing your cotton candy machine’s extractor head, several common mistakes can make your problem worse. Understanding what to avoid helps you complete the repair successfully the first time.
The biggest error people make is rushing through disassembly without paying attention to washer order. Each washer sits in a specific sequence. If you remove them carelessly, you won’t remember the correct arrangement during reassembly. Take photos or write down the order before removing anything.
Another frequent mistake is skipping the soaking step. Some people try to clean the head immediately with a dry pumice stone. This doesn’t work well because hardened sugar needs time to soften. Your pumice stone must soak in the warm vinegar solution for at least five minutes before scrubbing.
Incomplete cleaning causes jamming to return quickly. Many people clean only the visible surfaces and miss buildup inside the spinner head. Sugar accumulates in hard to reach spots. You must scrub thoroughly inside the entire head, not just the outer areas.
Overtightening the center nut during reassembly is another common problem. People assume tighter means better. Excessive tightening actually prevents smooth spinning and can damage the washers. Tighten until snug, then stop.
Don’t attempt repairs without fully disassembling the machine. Some people think they can clean around the edges while the head stays attached. This approach fails because you can’t access the real problem areas.
Finally, avoid reassembling with wet parts. Moisture left on the head or washers causes rust and future jamming. Dry everything completely with a clean towel before putting pieces back together.
Troubleshooting: What to Do If the Machine Still Won’t Spin
When your cotton candy machine still won’t spin after initial troubleshooting, the problem usually lies deeper in the extractor head assembly. The spinner head contains melted sugar buildup that prevents rotation even after basic cleaning attempts.
Start by checking if you reassembled the washers correctly. Washers sit in a specific order, and placing them incorrectly creates friction that stops the head from turning. Remove the center nut again and verify each washer sits flat and in the proper sequence. Spin the head by hand to feel for resistance. If it still catches, you likely have washer placement issues.
Next, examine whether your cleaning was thorough enough. Sugar buildup often hides in small crevices inside the head that simple wiping misses. Soak the head again in warm water mixed with white vinegar for a full 10 minutes this time. Use your pumice stone to scrub every interior surface, paying special attention to corners and grooves. Incomplete cleaning is the most common reason machines fail to spin after repair attempts.
Check the center rod itself for damage or warping. A bent rod prevents smooth rotation regardless of how clean everything is. Look closely under good lighting to spot any visible bends or cracks.
If the head still won’t spin smoothly after these steps, the motor may have lost power or the belt connecting to the head could be loose or broken. Verify the motor runs by listening for humming sounds when powered on. Check that all mechanical connections between the motor and spinner head remain tight and properly aligned.
These issues require systematic checking rather than guessing at solutions.
Final Thoughts
Fixing a jammed extractor head is a simple process once you know the steps. Sugar buildup causes most jamming problems in cotton candy machines. Regular cleaning prevents this issue from returning.
You now know how to unscrew the center nut and remove the head safely. Soaking parts in warm water loosens stubborn sugar residue. A vinegar solution breaks down buildup that plain water cannot remove.
The pumice stone plays a key role in this repair. It scrubs away hardened sugar without damaging the metal surface. Take your time during this step for the best results.
Washer placement matters more than people realize. Putting washers back in the wrong order causes the head to wobble or jam again. Always note their original position before removing them.
Testing your machine after reassembly confirms your fix worked. Spin the head by hand first before plugging in the machine. Smooth rotation means you completed the repair correctly.
Prevention is easier than repeated fixing. Clean your extractor head after every few uses. This habit stops sugar from building up into a bigger problem.
Regular maintenance also extends your machine’s lifespan. A well maintained extractor head performs better and lasts longer. Skipping cleaning leads to more frequent breakdowns over time.
Patience and attention to detail make this repair successful. Rushing through cleaning or reassembly often causes the same problem to return. Following each step carefully saves you time and frustration later.
With these tips, your cotton candy machine should run smoothly again. Keep your cleaning supplies ready for regular maintenance. Your machine will reward you with consistent, fluffy cotton candy for years to come.
Frequently Asked Questions
Why does my cotton candy machine’s spinner head jam so quickly?
Your spinner head jams because melted sugar builds up inside the center component. This buildup hardens as the machine cools. Once hardened sugar accumulates, the head cannot spin freely. The jamming typically happens within minutes of startup because the heat reactivates old residue. Regular cleaning prevents this problem from returning.
How do I know if my extractor head needs cleaning?
You’ll notice your machine stops spinning shortly after you turn it on. The head may feel stuck or resistant when you try to spin it by hand. Sometimes you hear grinding sounds coming from the center. These signs all point to sugar buildup inside the spinner head. Don’t ignore these warnings, as continued use can damage the motor.
What’s the best way to clean the extractor head?
Start by unscrewing the center nut to access the head. Remove the head and all washers carefully, noting their order. Soak a pumice stone in warm water for at least 5 minutes. Use the wet pumice stone to scrub away hardened sugar from the head. Follow up with a warm water and white vinegar solution to dissolve remaining buildup. Dry everything completely before reassembly.
Can I skip the pumice stone step?
The pumice stone serves a specific purpose. It removes stubborn sugar debris that warm water alone cannot dissolve. Skipping this step means incomplete cleaning. Incomplete cleaning causes jamming to return within days. The pumice stone is inexpensive and effective, so use it every time you clean.
What happens if I reassemble the washers incorrectly?
Wrong washer placement causes the head to jam again immediately. The washers control how freely the head spins. They must sit in the exact order they came off. Take a photo before disassembly to remember the correct sequence. Incorrect reassembly wastes your cleaning effort and frustrates you further.

Hi, I’m Frankie Shaw, the founder and writer behind Swittchly 👋. I’m a passionate tech enthusiast who loves exploring the latest gadgets, devices, and electronics that hit the market. Through my honest, research-backed Amazon product reviews, I help readers make smarter buying decisions without the hype or confusion.